Deploying your NodeJS app to Elastic Beanstalk (AWS Learner Lab Edition)
Creating a cool website that you can see on your computer is fun. Once you've got that, it's time to deploy it so the rest of the world can use it.
Contents
- Step 0: Write an application
- Step 1: Make sure your code works first
- Step 2: Make a Git repository
- Step 3: Prep your code for deployment
- Step 4: Zip up your code
- Step 5: Create your Elastic Beanstalk environment
- 5a: Application Setup
- 5b: Database setup
- 5c: Final setup
- Step 6: Connect to the database
- Step 7: Updating your website
- Step 8: More troubleshooting (logs)
- Step 9: Putting tables in the database
- Step 10: Success!
- Step 11: Making it better
I recorded video a few years ago that more or less covers the same stuff. The steps in this article are a little more up-to-date, and fix some common gotchas from the video, but if you prefer video, here it is.
Step 0: Write an application
This tutorial expects that you want to deploy a NodeJS web application that uses a relational database like MySQL or PostgreSQL. Steps will include creating the environment, setting up and connecting to the database, and learning how to update and troubleshoot your application.
Step 1: Make sure your code works first
If the code doesn't work on your machine, it's not going to magically work on a server. Make sure the code you want to run is working on your machine first before attempting to deploy.
Step 2: Make a Git repository
Git gives you version control, so you can make changes without fear of breaking your application forever. It allows you to roll back changes if you want, or merge changes from other people.
Install git on your computer, then initialize the repository, either through your editor (e.g., VS Code), through the Github desktop application, or through the command line (git init).
For NodeJS applications, you don't want your node_modules/ folder in the Git repository. NodeJS now includes package.json and package-lock.json to allow you to quickly get the same versions of your packages on any computer with npm install. Create (or update) a file in the base of your project called .gitignore, and put the following contents:
node_modules/
.env
If you want to ignore even more files, you can put the full Github-recommended NodeJS .gitignore file.
Step 3: Prep your code for deployment
Now that we have code running on our computer, we're going to set it up so AWS will know how to run it, and so that the running code on AWS will work correctly.
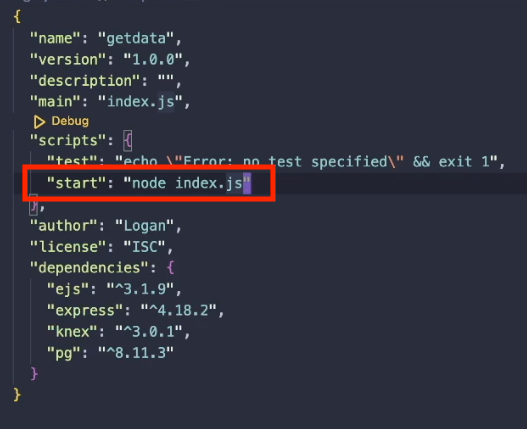
First, make sure that your package.json file has a script called "start". This script tells AWS how to run your project. Most likely that's with node index.js, but if yours is different, put the proper script there.
In your index.js file, you likely set up your project to run on port 3000. In the AWS environment, we need to use the environment variable PORT to configure which port our application runs on. Do that by specifying the port with process.env.PORT, then using that variable in the app.listen() command.
const port = process.env.PORT || 3000;
app.listen(port, () => console.log("Website is running!"));
Commit your changes.
Step 4: Zip up your first (kinda) deployment-ready version
Now it's time to get the first version of our code to AWS so we can start to get deployment going. It's not fully ready yet, especially if we have a database to create and connect to, but it's ready enough that we can deploy to get our environment ready.
Git has a handy command to create a Zip file of all of our code. Open a terminal inside your project (Ctrl+` in VS Code) and run the following command to create a zip file called v1.zip containing all code currently committed to the main branch. If you want to use a different branch (like master instead of main), or a different filename, change those in the appropriate arguments.
git archive --format=zip --output=v1.zip mainNow we want to make sure these Zip files don't get added to our git repository - there's going to be a lot of them, and it's not really code we want to track. So update your .gitignore file with the following line:
*.zipCommit your changes.
Step 5: Create your Elastic Beanstalk Environment
5a: Application setup
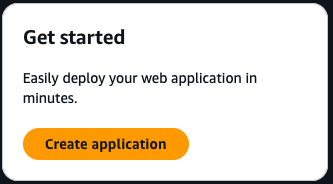
Now we're ready to create our Elastic Beanstalk environment for deployment. Open up the Elastic Beanstalk section of AWS's management console, and click the button to "Create application"
Once there, you'll create a new application with the Web server environment. Put in a name (the name is for you to know which application this is) and the Environment name will automatically be created for you. If you want to have a custom domain under elasticbeanstalk.com, you can enter that and Check availability to see if it's open
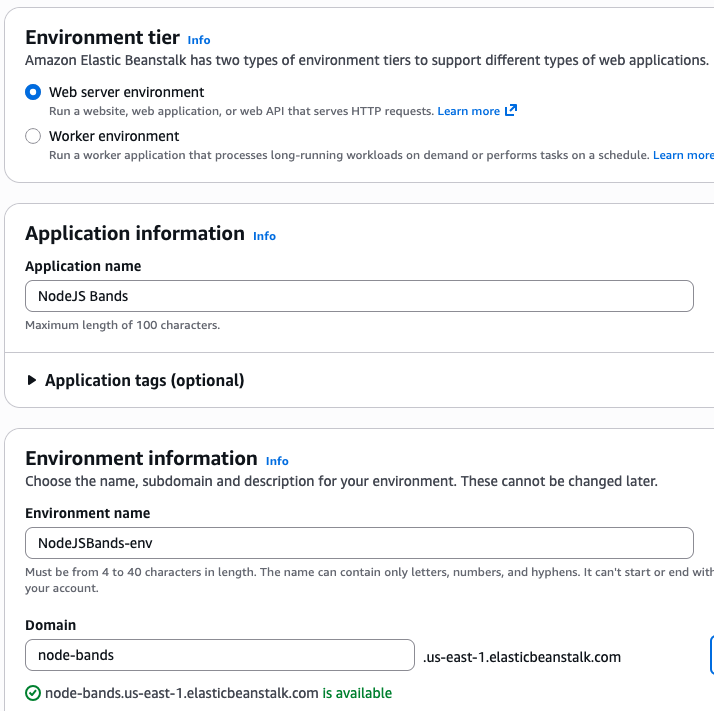
Select the Node.js platform with the latest version of NodeJS available (v22 as of the time I write this). Then under Application code, choose "Upload your code, put a version label, select Local file, and upload your v1.zip file. Leave the Presets as Single instance (free tier eligible). Click Next
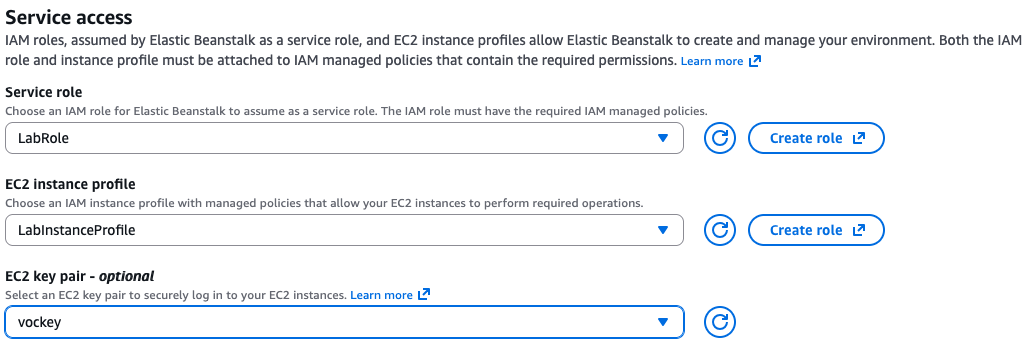
On the next page, the steps will be different for the AWS Learner Lab compared to a normal AWS account. In the Learner Lab, select the Service Role LabRole, the EC2 instance profile LabInstanceProfile, and the EC2 key pair vockey (screenshot below).
In a normal AWS account, the Service role and Instance profiles should be whatever the profiles are that are available.
Click Next.
5b: Database setup
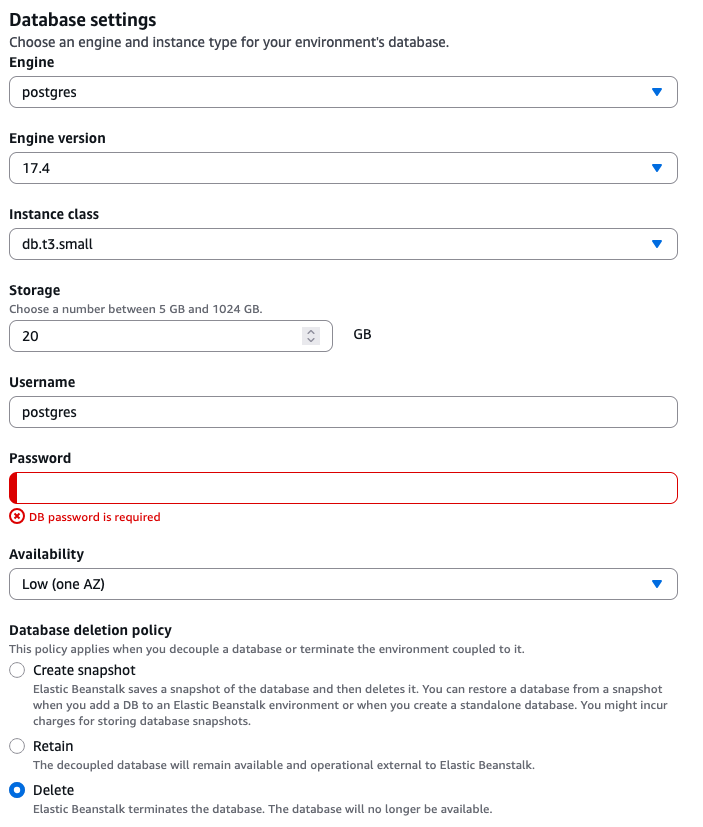
Elastic Beanstalk gives us the option to set up an RDS database that is automatically configured to connect to our Elastic Beanstalk application. On the next page, under Database, select Enable database.
Then select these options:
- Engine: postgres
- Engine version: Whatever's newest (17.4 at the time I write this)
- Instance class:
db.t3.microis great for small loads. You can increase this later as needed. - Storage: 20GB should be fine for testing, more if you need more
- Username: Whatever you want
- Password: Whatever you want, but it better be a good, strong password. No
Password1! - Availability: Low (one AZ) - production applications should use high availability, but low is good for testing and learning.
- Database deletion policy: Delete (or Retain)
- The database deletion policy determines what happens to your database if you ever decide to delete your Elastic Beanstalk app. If you know this DB will only exist with Beanstalk, choose Delete. If you think you might want it later, choose Retain. You can always delete it later.
Click Next.
5c: Final setup
On the "Configure instance traffic and scaling" page, leave the defaults. Click Next.
On the "Configure updates, monitoring, and logging" page, you can choose to put an email address in Email notifications to get email alerts on the status of your application deployments. This can be helpful to monitor the application.
Click Next.
Review the options you've selected, then click "Create". Now wait.
package.json packages, and get everything ready to go. Give it some time.Step 6: Connecting to the database
Once the application is created, you'll see the Environment overview move the Health status to Okay. This means one thing: AWS was able to create the instance, install the packages, and start the application without errors. It doesn't mean everything is working, though.
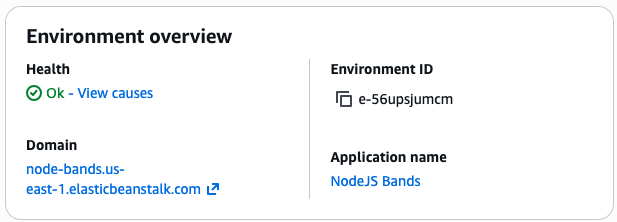
If you click the link to visit your application's domain (under domain below), you'll get an error that looks something like this:
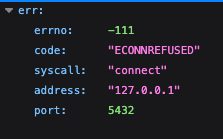
This error is telling us that something went wrong. What exactly went wrong? Well, our code is set up to connect to a database, but in the development environment, that database is running on our own machines (127.0.0.1) on port 5432. In our production environment, though, that database is not on the same machine as our code, so our attempts to connect to the database are failing.
So let's update our code to connect to the RDS database. Helpfully, Elastic Beanstalk automatically creates environment variables that we can use to connect in production. Update your database connection settings as follows:
const knex = require("knex")({
    client: "pg",
    connection: {
        host: process.env.RDS_HOSTNAME || "localhost",
        user: process.env.RDS_USERNAME || "postgres",
        password: process.env.RDS_PASSWORD || "SuperSecretPassword",
        database: process.env.RDS_DB_NAME || "music",
        port: process.env.RDS_PORT || 5432,
    }
});
This change allows your local environment to keep working, but the production environment will use the environment variables. If have already set up your code to use a .env file and environment variables, that's great! Just update the environment variables names in the .env file to use the RDS variables above. Then your local environment will still work with your .env, and the deployed environment will connect to RDS.
Commit your changes, and make a new zip file with the git archive command.
Step 7: Updating your website
To update the website, all you have to do is give Elastic Beanstalk the latest version of your code. On the environment overview page, click "Upload and deploy" in the top left. Click "Choose file" to select the new zip file, and set the version name to whatever you want so you can see which version of your code is running.
Once you deploy, it's going to create a new EC2 instance, deploy your new code, and then start running it. Once the Health returns to Ok, you should be able to visit your domain. You'll probably get an error. That's okay. It's a different error than before, which is usually a good sign. It means we fixed one thing, and now we can fix the next thing.
Step 8: More troubleshooting (Check the logs)
We've got another error, so we need to dig into what's going wrong so we can fix it. To do that, in your Beanstalk environment, open the Logs tab, click Request logs, and select "Last 100 lines." This will get you a link to "Download" and look at the last 100 lines of the log files on the server. Most of the time that's where you're going to find the error.

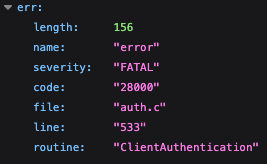
It takes some experience to learn how to find your errors in the logs, but often the problem is either in the section labeled /var/log/web.stdout.log (for problems with our code) or in /var/log/eb-engine.log (for problems with our environment's configuration). If you search this file for the word "error", you should find a section that looks something like this:
error: no pg_hba.conf entry for host "172.31.88.85", user "postgres", database "ebdb", no encryption
   at Parser.parseErrorMessage (/var/app/current/node_modules/pg-protocol/dist/parser.js:287:98)
   at Parser.handlePacket (/var/app/current/node_modules/pg-protocol/dist/parser.js:126:29)
   at Parser.parse (/var/app/current/node_modules/pg-protocol/dist/parser.js:39:38)
   at Socket.<anonymous> (/var/app/current/node_modules/pg-protocol/dist/index.js:11:42)
   at Socket.emit (node:events:519:28)
   at addChunk (node:internal/streams/readable:561:12)
   at readableAddChunkPushByteMode (node:internal/streams/readable:512:3)
   at Readable.push (node:internal/streams/readable:392:5)
   at TCP.onStreamRead (node:internal/stream_base_commons:189:23) {
 length: 156,
 severity: 'FATAL',
 code: '28000',
 detail: undefined,
 hint: undefined,
 position: undefined,
 internalPosition: undefined,
 internalQuery: undefined,
 where: undefined,
 schema: undefined,
 table: undefined,
 column: undefined,
 dataType: undefined,
 constraint: undefined,
 file: 'auth.c',
 line: '533',
 routine: 'ClientAuthentication'
}
This tells us a few things: (1) it's something to do with the database again, (2) the error code is '28000', (3) it has something to do with authenticating with the database. Some research will show you that the error relates to SSL encryption of the connection to the database - RDS requires encryption, but your local database does not.
Learning to read the logs will be an important part of learning how to deploy an application to Elastic Beanstalk. A few things that might help:
1. The logs are generally in chronological order, meaning the most recent stuff is at the bottom of each section. Start at the bottom of the sections when looking for errors.
2. Search for words like "error" or "warning" - those are usually a good indicator that something is wrong.
3. You can probably ignore
/var/log/nginx/access.log and /var/log/nginx/error.log warnings, at least for now. These aren't problems that will break anything for us, so we're just going to leave them alone.To fix it, we need to update the knex configuration to use encryption, but only in the production environment. This will involve changes to your code and to the environment.
First, update the knex configuration as follows:
const knex = require("knex")({
    client: "pg",
    connection: {
        host: process.env.RDS_HOSTNAME || "localhost",
        user: process.env.RDS_USERNAME || "postgres",
        password: process.env.RDS_PASSWORD || "SuperSecretPassword",
        database: process.env.RDS_DB_NAME || "music",
        port: process.env.RDS_PORT || 5432,
        // The new part
        ssl: process.env.DB_SSL ? {rejectUnauthorized: false} : false
    }
});
This ternary expression sets the value of the ssl: configuration based on if the DB_SSL environment variable is present. In the local environment, the value will be false, and in the environment with DB_SSL set, the value will be {rejectUnauthorized: false}, which is how we tell knex to use the SSL encryption.
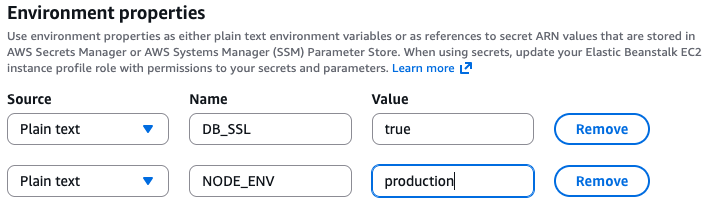
Now we need to update the environment to have that variable. Go to the environment on Elastic Beanstalk and click "Configuration" in the menu on the left. Once there, click "Edit" in the Updates, monitoring, and logging section. Under Environment properties at the bottom of the page, click "Add environment property", then set the name to DB_SSL, and the value to true (really, the value just needs to be truthy, but true makes sense).
While we're here, I'm going to have you create another environment variable that we commonly use in NodeJS environments: NODE_ENV. NODE_ENV tells the NodeJS server whether it should be running in development mode or production. Development mode will show detailed error messages to the user, which isn't usually what you want for your production application. Add a new environment variable with the name NODE_ENV and the value production.
Click Apply, and the environment will be updated with the new configuration. This may take a minute while the servers are redeployed.
Now we'll deploy the updated code. Commit your code changes, create a new zip archive with git archive, and upload the new version, then wait for it to be deployed.
Step 9: Putting tables in the database (aka More errors? Are you kidding me‽)
Visit the site again... guess what? It still doesn't work. Hit up the logs again (and actually look at your logs, not just my copy below. This is practice for troubleshooting your own stuff in the future). See if you can figure out why. What you'll probably find there is something that looks like this:
error: select * from "bands" - relation "bands" does not exist
   at Parser.parseErrorMessage (/var/app/current/node_modules/pg-protocol/dist/parser.js:287:98)
   at Parser.handlePacket (/var/app/current/node_modules/pg-protocol/dist/parser.js:126:29)
   at Parser.parse (/var/app/current/node_modules/pg-protocol/dist/parser.js:39:38)
   at TLSSocket.<anonymous> (/var/app/current/node_modules/pg-protocol/dist/index.js:11:42)
   at TLSSocket.emit (node:events:519:28)
   at addChunk (node:internal/streams/readable:561:12)
   at readableAddChunkPushByteMode (node:internal/streams/readable:512:3)
   at Readable.push (node:internal/streams/readable:392:5)
   at TLSWrap.onStreamRead (node:internal/stream_base_commons:189:23) {
 length: 104,
 severity: 'ERROR',
 code: '42P01',
 detail: undefined,
 hint: undefined,
 position: '15',
 internalPosition: undefined,
 internalQuery: undefined,
 where: undefined,
 schema: undefined,
 table: undefined,
 column: undefined,
 dataType: undefined,
 constraint: undefined,
 file: 'parse_relation.c',
 line: '1449',
 routine: 'parserOpenTable'
}
Yours may not say "bands," since that's my application, but it will say something about relations not existing. Why is that? Because we haven't created any tables in our new database. We have a database in RDS, but it's empty—no tables, no nothing. You have a working database on your computer, but the RDS database hasn't been set up.
We have a couple options to fix this: the automated way, and the manual way.
Automated way: Use Knex migrations to create database tables
Database migrations are a way to create your database using Javascript code. It has the advantage of being repeatable, so if you never need to recreate your database, or set up a new local copy for a new developer on your team, you have the full database creation documented in code, ready to run.
The process is a bit involved, so I've made a separate writeup. If you want to follow those steps, head over to that tutorial, then come back here to complete the steps.
Manual way: Connect to the RDS instance and create tables
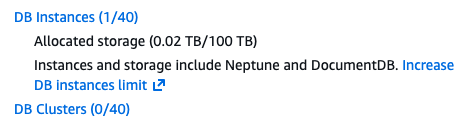
In AWS, you now need to go to the Aurora and RDS section of the Management Console (search with the bar at the top). You should see that you have a DB instance. Click that to view your instance.
Click the instance to see more details. Scroll down to see the following information:
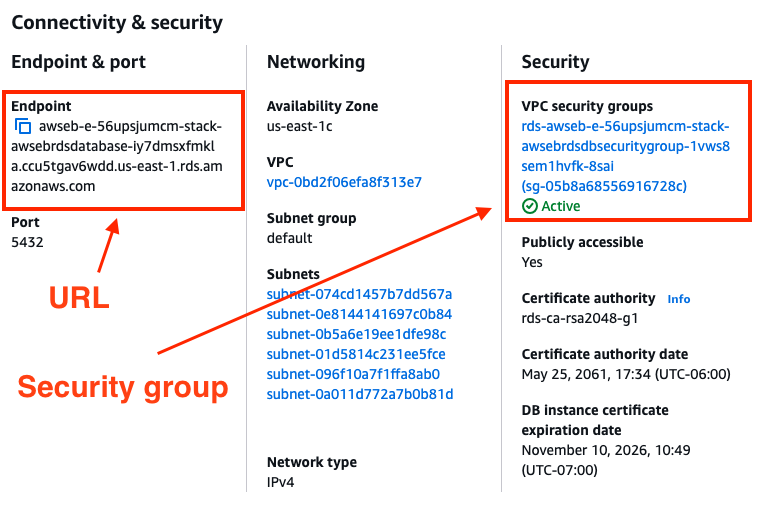
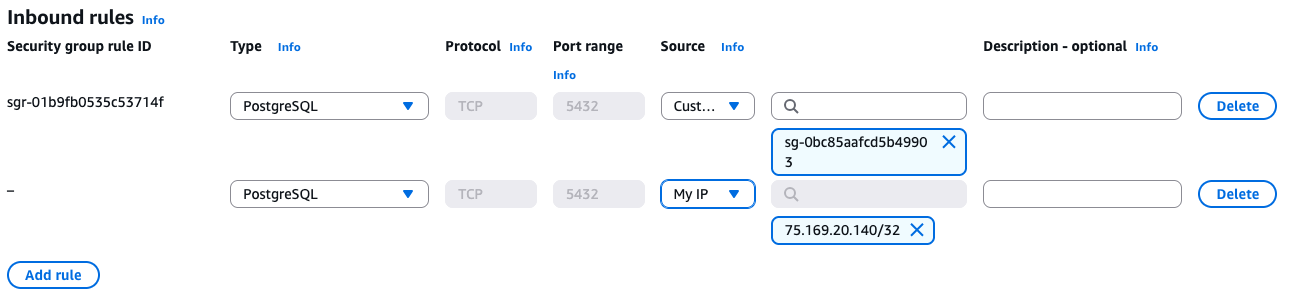
To connect to the database, click the security group to add a rule that allows your IP to access the database.
Now you can use the endpoint URL and the username and password you created when you set up the Beanstalk RDS instance to access your server using pgAdmin or whatever program you like to use to access and edit databases.
Once you have the database connected via pgAdmin, you can create your tables just like you did in your local environment. Once you've created all the right tables with all the right columns, you should just be able to refresh the page to see your working application.
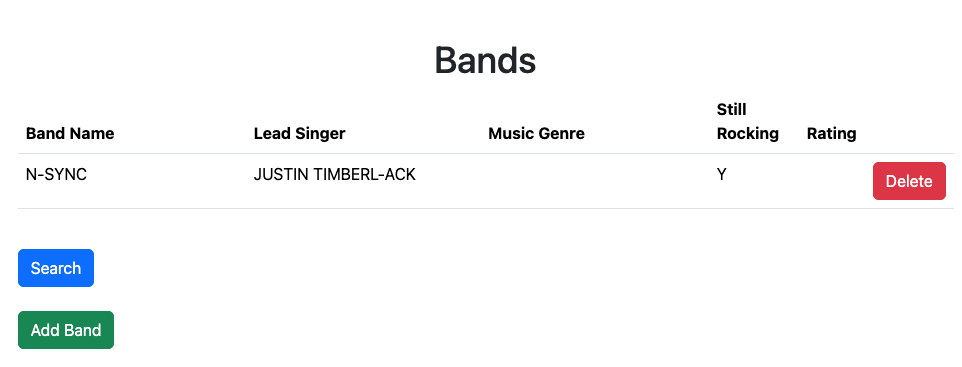
Step 10: Success!
Step 11: Making things nice, making things easy
Once you've got a website, it's time to polish it up so that it works the way you want it to work. Here are some things I'd recommend:
- Set up Let's Encrypt for certificates on the site
- Set up database migrations so you don't have to create the tables by hand
- Set up CodePipeline (NOT AVAILABLE IN THE LEARNER LAB) to automatically deploy new versions of your code that you've pushed to GitHub